
I was excited when my sons told me about these bracelets everyone at school was making, and even more excited to do it without the loom!
There are several rubber band bracelet designs that can be easily made without using the loom.
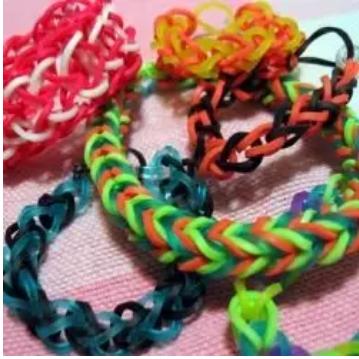
All photos by Valerie Bloom
Rubber Band Bracelets: Several Patterns That Don't Require a Loom!
I was excited and intrigued when my sons told me about bracelets that "everyone" in their elementary school was making.
They are bracelets created by linking together small, colorful rubber bands, sold under the brand name Rainbow Loom.
While I was prepared to spring for the loom kit, which sells for $16-$18, I soon learned that I might not have to buy the whole kit. Our nine-year-old cousin said she knew how to make the bracelets without the loom and would be happy to give us a lesson!
Completed chain bracelet
Do You Really Have to Buy the Loom?
No, you don't. It's a bit more tricky, but it's actually fun. I hoped that my kids would have fun making bracelets without the added cost of the loom. And going "loom-free" would mean just a little less clutter in the house!
I figured if the process of making the bracelets by hand proved to be too difficult, I would be happy to buy the Rainbow Loom. Therefore, I didn't feel like it was risky to purchase the rubber bands without the loom.
All you need are rubber bands!
A simple and beautiful chain bracelet
As she promised, our cousin came over to show us how to link the rubber bands together to create a bracelet.
My sons, nine and six years old, were initially frustrated. I was a little confused myself at first, but I also understood that these kinds of projects often seem difficult until something clicks in your head and you realize that it's really very simple.
And that was exactly the case! Once we figured out the process, we were able to easily put together simple chains, attached at the ends with small plastic c-clasps that were included with the pack of rubber bands.
Chain bracelet
How to Make a Rubber Band Chain Bracelet
NOTE: There's a link to a great video below, so if the written instructions are confusing, check out the video!
Slide a segment of a rubber band into a c-clip. Ideally, the rubber band should be doubled over (make a figure-8 and fold it over on itself to create a small circle) and slipped inside the c-clip. Let's call this rubber band #1.
Now another rubber band (let's call it #2) is slipped halfway through rubber band #1. Try not to twist #2. You then grab the two sides of #2 and hold them together. #2 is looped through #1 but will easily slip out if you let go.
Now, carefully gripping #2, you slide the next rubber band, #3, through the hole created by stretching #2. As you hold #3 and let go of #2, you'll see that #2 is firmly attached to the bracelet and you now need to hold #3 to prevent it from slipping out from #2.
Hold #3, stretching it out to create an opening, which you then slide #4 halfway through. Grab the two sides of #4, letting go of #3, and slide #5 halfway through #4. Continue this pattern.
This process creates a simple chain. When the bracelet is long enough to fit comfortably around your wrist—not too tightly—then take the last rubber band in the line and slip one side of it through the other (one loop through the other) and pull it tightly to firmly attach it to the previous rubber band. Now slip the last rubber band's loop into the same c-clip that is holding the first rubber band.
Tah-dah!
You can choose to not use the c-clips at all and can simply tie the ends of the bracelets together. It's a good idea to knot the ends first by sliding one loop of the band through the other (as above) and then tying the ends together.
See the following excellent video that clearly shows how to make the same kind of rubber band bracelet that our cousin taught us how to make. Rubber bands are simply looped together to form a chain. Starting it is the hardest part; stringing the bands together is a piece of cake!
Video Tutorial for Making Basic Rubber Band Bracelets
A bracelet made with teamwork
Helping Younger Kids
When we were first shown how to make the simple chain bracelet by hand, both of my sons were overwhelmed at the prospect of doing it themselves. And this is completely understandable, since it does feel like you need three or four hands!
And so we used four hands.
My job was to hold the most recently added rubber band in place. I held it securely, making sure it didn't fall out of the bracelet and stretching it open so that my son could choose the next color band and slide it through the one I was holding. Without the stress of trying to hold a rubber band in place, my sons started to enthusiastically string the rubber bands together, and it took less than 10 minutes to complete each bracelet.
After working with me to create a couple of bracelets, my older son got the hang of it and started doing them completely on his own. My younger son still prefers to have help, which is fine -- creating the bracelets as a team is a lot of fun!
Rubber Band Bracelets in Different Patterns
With our first lesson, we cranked out several bracelets. Then it occurred to me that perhaps something more than the basic chain could be made without using the loom.
Looking on YouTube, I found two good videos showing other patterns. One is called the fishtail, and the other the dragon scale. (Scroll down to see these videos.)
Once we got the hang of these patterns, my sons and I were able to make the bracelets without much difficulty.